Cisco ISE and Versa Director TACACS+ Server Integration.
- Enis
- Jan 1, 2021
- 5 min read
Updated: Mar 13, 2022
Create Active Directory Groups
To control the level of access users have when logging into Versa Director we need some groups created in Active Directory. For my setup, I’m going to create these groups in Active Director. These are predefined user roles in Versa Director.
ProviderDataCenterAdmin
ProviderDataCenterOperator
ProviderDataCenterSystemAdmin
TenantOperator
TenantSecurityAdmin


Verify DNS is Configured
For ISE to work properly with AD you need to make sure that you set your domain name and DNS servers during the initial setup. You can verify these settings with the console (or SSH) command

Join ISE to Active Directory Domain
The next thing we need to do is get ISE joined to the Active Directory Domain. This is what will
allow ISE to match the AD groups we created earlier.
⦁ Navigate to Administration -> External Identity Sources -> Active Directory and click on Add.

⦁ Enter your domain name in both the Join Point Name and Active Directory Domain boxes

⦁ Click the Submit button.
⦁ Click Yes to join all ISE nodes to this Active Directory domain when prompted

⦁ Enter the credentials you use when joining machines to your domain.

⦁ Click OK.
You should now see the status of your Join Point change to Operational and list your domain controller.

Add Active Directory Groups to ISE
Now we are going to add the AD security groups we created earlier to ISE.
⦁ At the same screen you were at to join AD, click the Groups Tab
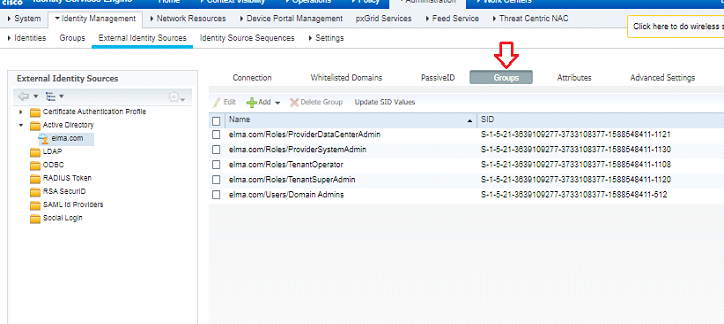
2. Click Add -> Select Groups from Directory.

3. Search for the groups you created and check the boxes in front of them.

4. Click Save.
Adding Versa to ISE
Now that we have enabled TACACS we need to add Versa devices.
1. First create Network Device Profile
Navigate to Administration ->Network Resources ->Network Device Profile click Add


2. You can add them individually, by subnet, or set up a profile to match all devices. I’m going to add my devices individually.
Navigate to Work Centers -> Device Administration -> Network Resources -> Network Devices and click Add.
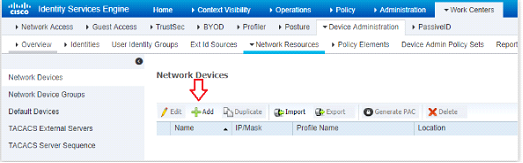
Fill in the Name – Ip and choose Profile VersaDirector.

Check the box next to TACACS and enter the shared secret you wish to use with that device

The checkbox for Enable Single Connect Mode is optional but it’s a good idea to use it if you have a stable network connection between Versa Director and the ISE server. What this setting does, in very basic terms, is keep a single TCP connection open between the device and the ISE server while authenticated to the device. Without this option, the server will open a new connection for every subsequent TACACS+ request from the device. This means less network overhead and response times
Configuring TACACS Profiles
All predefined roles available in Versa Director are supported for Tacacs. This includes provider user roles and tenant user roles. These roles must be mapped to the user in a Versa specific attribute-value (AV) pair in Tacacs server configuration.
Navigate to Work Centers -> Device Administration -> Policy Elements -> Results -> TACACS Profile and click Add.

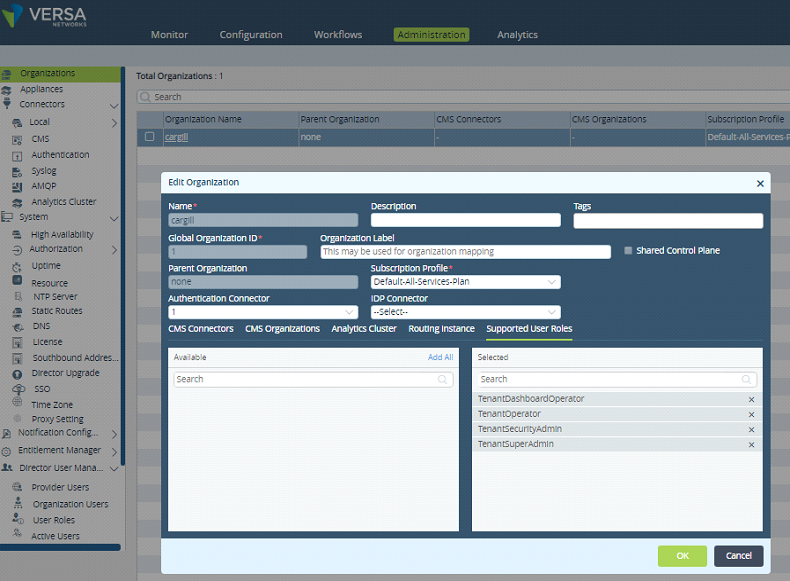
2. Create different tacacs profile for each user role and tenant.
Let me do show the steps for TenantSecurityAdmin Role for tenant Cargill.
Name TenantSecurityAdmin
Profile Attributes
Versa-Role=TenantSecurityAdmin
Versa-Tenant=customer

Create Tacacs Profile for all roles.

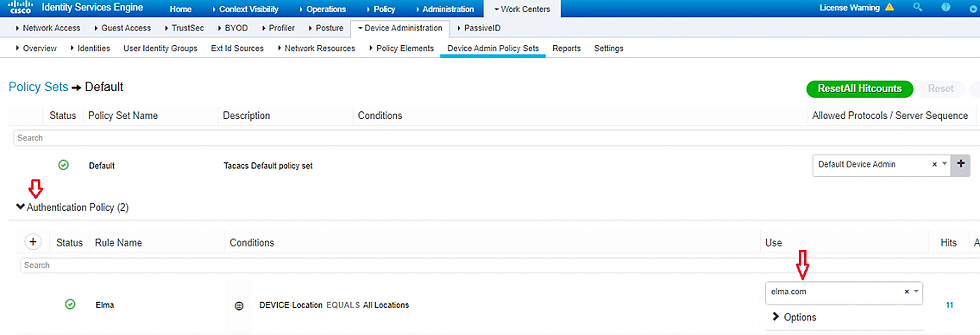
Configuring TACACS Authentication Policy
Now we need to tell ISE what Identity Source to use and then define the Authentication Policies that will give our AD groups the right Versa Director Roles.
⦁ Navigate to Work Centers -> Device Administration -> Device Admin Policy Sets and click on the Default policy set.

This one is a little tricky. You have to click the right arrow (or sideways carrot) icon. Also, if you prefer, you can create a new policy set instead of editing the default. This is meant to be a simple TACACS setup so I created a new policy name, Elma.
Click the down arrow (or upside-down carrot) to expand Authentication Policy and change the Use box to your Active Directory as Identity Source we created earlier,
Expand Authorization Policy and click the + icon.

Give your policy a name. Then, click the + icon.

In the editor that opens click into the Click to add an attribute box and select “Yourdomain.com External Groups” and then choose your user groups from the List in the box to the right of Equals.


Choose your Tacacs Profiles or Shell Profiles.


Repeat these steps for all Versa Roles and assign them correct Shell profiles than save

Configuring the Versa Director for TACACS+ through ISE
You need to configure a Tacacs authenticator connector under Administration ->Connectors->Authentication.

Note the role of the “Default Connector”:
⦁ When this box is the ticket, the authentication of users accessing the VD GUI will always take place through Tacacs as long as the Tacacs server is available.
⦁ If the server is available, but no valid user accounts are present, the login will fail. Make special notice of this because it could lock you out completely from accessing VD.
⦁ When this box is ticked, it is NOT required to provide an authentication suffix to the username.
⦁ When this box is NOT ticked, the username must be prepended with a suffix to authenticate through Tacacs.
⦁ For provider users, the suffix is @System (e.g. Administrator@System)
⦁ For tenant users, the suffix is @<tenant-name> (e.g. john@Enterprise1)

Note the new file called “ EXTERNAL_USER.log”. In this file, it is logged what CLI commits a remote AAA user has done.
admin@versa-director:~$ sudo tail -f /var/log/vnms/ncs/vnms-external-auth.log2/04/2019 05:40:11,123 External Authentication script called
12/04/2019 05:40:11,130 inside parseUserName
12/04/2019 05:40:11,135 after cut userString: armut@customer
12/04/2019 05:40:11,158 end of parseUserName... userName: armut
12/04/2019 05:40:11,160 username: armut
12/04/2019 05:40:11,162 orgname: customer
12/04/2019 05:40:11,232 isSSOEnabled=None
12/04/2019 05:40:11,303 isExternalOAuthTokenServerEnabled=false
default authConnectorName :
User armut@customer does not read from cache due to skipCache
12/04/2019 05:40:11,742 authConnectorName: 1
12/04/2019 05:40:11,900 authConnectorType: tacacs
12/04/2019 05:40:12,801 tacacs_ipaddress: 192.168.175.40
12/04/2019 05:40:12,802 tacacs_port: 49
log4j:WARN No appenders could be found for logger (com.tailf.maapi.Maapi).
log4j:WARN Please initialize the log4j system properly.
log4j:WARN See http://logging.apache.org/log4j/1.2/faq.html#noconfig for more info.
12/04/2019 05:40:15,068 tacacs_service: test
12/04/2019 05:40:15,434 versaTenant: customer
12/04/2019 05:40:15,436 versaRole: TenantSecurityAdmin
Authentication order:
Currently (16.1R2-S10) it is only possible to configure the authentication order for VD authentication in CLI:
Administrator@Director1% set NMS provider auth-connectors config auth-order
Possible completions:
local-then-remote - Try local authentication first, then remote
remote-then-local - Try remote authentication first, then local
Remote-then-local = default
Note that the authentication order is only applicable when the remote authentication server is not available. It doesn’t act as a fall-back user file. So if the user cannot be authenticated against a working Tacacs server, it will not fall back to local.
Accounting
The Tacacs connector will not provide accounting records to the Tacacs server for Tacacs authenticated users in Versa Director. All Accounting is done already in Versa Director Audit files.


Comments